Tuesday, April 17, 2012

Pinterest Craft: Chandelier Bird Feeder

Ahhhh, the first completed Pinterest Craft! The one that got my addiction started! So, the story goes a little something like this: Tab and I were strolling in Downtown Natchez (MS) in and out of the consignment and antique shops when I came across this chandelier in the basement. I drug it up to the counter and the clerk could just see the excitement as I asked how much it cost. Tab and the clerk both rolled their eyes when I told them I would be turning this old, rusted light fixture into an awesomely awesome bird feeder. And just to prove them both wrong, I set about completing it the very next day. Time to complete, about 2 hours.


Hang the chandelier (which is HEAVY) on a shepherd's hook. Be sure to cover the hook with a trash bag to avoid the overspray from the paint. In case you are lost, a shepherd's hook is a plant hanger that has a crook on it. Found in garden centers.


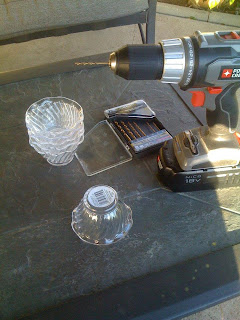
While the paint is drying, take an electric screwdriver and a small drill bit. I found these plastic dessert bowls at Fred's Discount Store for a dollar. These will serve as the seed dishes.

I drilled holes in the bottom of the dishes so that rainwater could drain out of the dishes. After the project was completed, I came back and added holes in the sides as well.

I superglued the bowls to the light fixture to make it look like they were sconces. I was careful not to apply the glue in the areas that I had drilled holes.  You can use this just as you see it here as an outdoor light fixture with tea lights  or ....

Fill with birdseed to use as a birdfeeder!  The birds LOVE this!

Pinterest Craft: Floating Book Shelf

This project was a simple and fun one that took about 10 minutes to complete. I used this in my guest room. Again, this is a first attempt project and now know other tips and tricks that I would do if I were to do it again.


A corner bracket, a hard cover book and an electric screwdriver is all you need.


 I situated the book so that the bind of the book would face out and upright. I pre-drilled holes so that the screws would go into the pages (to avoid the screws poking downward.)


I went ahead and screwed in the screws to get the pages ready. I then took them out to hang the bracket on the wall.


 Use a level to get the bracket square on the wall. Screw it into the wall first. Try to set it pretty low on the wall so the bracket will be less noticeable.


 Then, from the bottom up, screw the book into the pre-drilled holes. Screw slowly so that the screws pull the pages of the book together.


The finished product. A group of books 'floating' on a wall. Just in case my guests decide they want to read before bed. (I chose the titles "True Colors" "Just Breathe" and "One Day at a Time" so as to give it an uplifting vibe.)

Pinterest Craft: Jewelry Organizer

So, I have recently become a Pinterest addict. I search for ideas of things that I can do to fill my time, organize my life and make me proud of something I have created. Since I want to show off (because that's how I roll) I have decided to document them as I make them.

This is the first project I found on Pinterest. As soon as I saw the original picture, I recognized the printer's drawer as the display shelves my brothers used for their micro machines when we were growing up. I got excited! So, I dug the shelves out of the back office and brought them home, determined to make the organizer.

And they sat, propped up against my dining room wall, for about two months. :o)

Finally, I got on the ball. Two hours of work were totally worth it. Below is the step-by-step.

The printer drawer was old and in need of a good cleaning. It was brittle and antique-looking. I LOVED IT.


 I gave it a sealing stain (3 coats) and allowed to dry for a couple of days.

These are the tools I used to make the jewelry organizer.  The "U shaped nails" are found in the electrical section of your local hardware store. Most employees do not know what you are looking for. Go to the electrical section and search. They are not with the nails, screws, etc. Just a tip to avoid you having to go back and forth as much as I did.


Okay. Determine which side you will use for the bottom and decide how many hooks you want to have. Keep in mind that the jewelry will get tangled if you put them too close together. I decided to put my hooks one inch apart. I made marks with a pencil to evenly space. I pre-drilled the holes to ease the installation on the hooks.


I hammered in the "U Shaped Nails" into the slots. It goes without saying that the larger nails went into the larger slots. I didn't add nails to every single slot because I know that some earrings will overhang. I took a board or two out here and there to make some of the compartments larger. I also added hooks on the sides. (After this picture was taken, I added more hooks on the sides to hold my rings.)


Viola! My jewelry is easy to find, easy to put away and it just look fabulous! Now it's time for me to get started on the other two for all the other jewelry.